
You got a premium web hosting? Thinking of creating Private Blog Network? Whether using service providers such as Crazy Domains, GoDaddy, cPanel or others? As long as you have cPanel to work with, then, here are the required steps for creating multiple websites using just a single web hosting account.
Video Lesson Explains How to Create Multiple Websites Using a Single Web Hosting Account
Below steps are for adding a domain through cPanel.
Find Add On Domain Menu Link & Modify Settings in cPanel

Final Tweak for Your Add On Domain is to Add Redirect
Last step for hosting an additional domain under the same web hosting account is to make sure that the server can handle redirection of the Addon domain so that everything works correctly (select Redirect with or without WWW).

Adding a Domain Registered with Different Domain Registrar
Since there are many different scenarios setting up domains on Internet (such as unique IP, domain registered using different registrar, subdomain hosting) you’ll need additional information when the domain you are hosting is registered with a different domain registrar.
For example: you registered the domain with GoDaddy Domains, but your web hosting service provider is with DreamHost. In such cases, adding a domain to your web hosting requires changes to be made on the Domain registrar DNS Settings.
For creating an Addon Domain using cPanel IF you registered the domain name using a different registrar, you must first identify your web hosting server details first so that you can point your domain name DNS settings and A record IP pointing to your web hosting server you want to add your domain to.
- Name Server Details
- IP Address the domain will point to
Name Server Details
Easiest way to get details for the Name Servers settings that your domain name should point to, can be obtained through your web hosting provider by simply either visiting the help section, or email the support team to get Name Servers details.
IP Address
Your cPanel will reveal the IP Address (on the left hand side when you login). Or, you can email your web hosting service provider and ask them what IP if your web server is using.
If you already have a domain hosted on your web server, you can conduct Reverse IP check or use Windows Command Prompt and ping your domain name
ping example.com
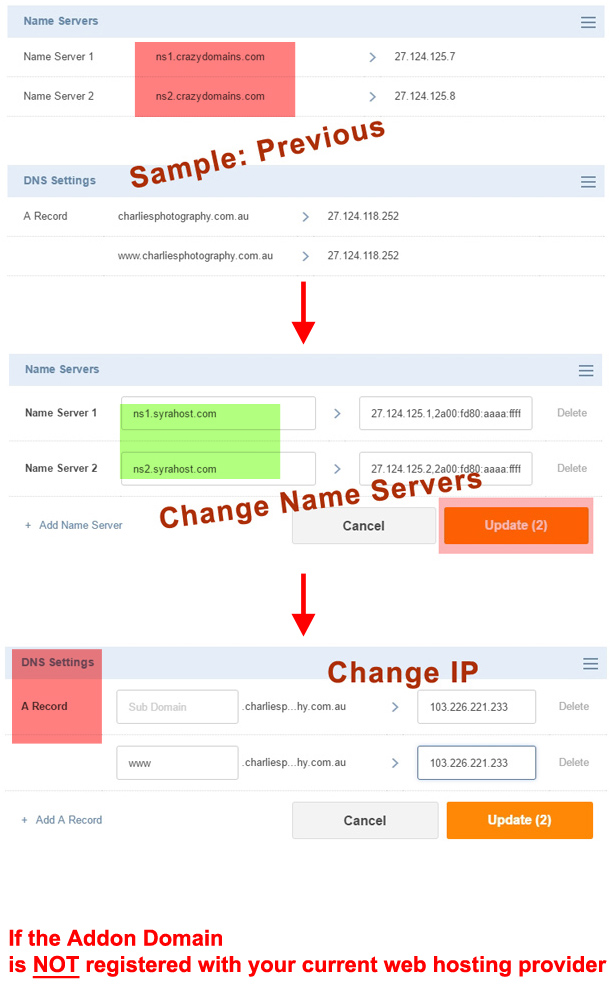
Once you have Name Server Details and IP Address, then, simply change the settings on the domain name registrar side, pointing the domain (registered elsewhere) to your web hosting server where you want to create Addon Domain. Study the image below carefully
Once the Addon Domain is setup, you’ll need to wait for DNS to propagate the new details. You can speed the process up by using www .proxysite. com and request your domain using different servers. Furthermore: its very important to make certain that Redirection works correctly. Check to see if redirection works correctly by accessing your new domain using https://www.example.com or http://example.com
Search Engine Optimization Tips by RankYa for Addon Domains
If you are operating a small business website, then, consider having these web pages
- Terms and Conditions
- Privacy Policy
- Contact Us Page
If your new website is in the development phase, then, make sure to have NO INDEX directive in HTML head section so that Google won’t be able to index your new site till its ready to go live online. Once you created engaging and useful content and your new website is ready, verify your new domain with Google Search Console so that you can begin getting website traffic quicker. Also, check out SEO techniques by RankYa
What’s the Difference Between Addon Domain vs Subdomain?
A Subdomain is a domain you create as an extension to your main domain. Think of your domain as a MAIN Folder. And Subdomains are folders who create inside that MAIN Folder. You can create as many subdomains as you want.
For example: if I created a subdomain and called it ‘exampleone’, then the server will have this folder structure
- rankya.com/exampleone/
And the address for accessing that subdomain will be through exampleone.rankya.com. Basically, subdomains are NOT registered domains as they reside inside a folder under your MAIN domain folder.
Whereas an Addon Domain is a completely separate domain, addon domains are domains you can host on your web server but they are domain registered by Domain Name Registrar.
Thanks for this step-by-step guide I was struggling with addon domains your explanation made it so much simpler.
Thanks for stopping by great to hear this blog post has been helpful 🙂
Great tutorial thank you. Quick question please does this method also work for subdomains, or is the process different?