What is WebMCP?
Model Context Protocol (WebMCP). Is a new web protocol using WebMCP API which enables web applications and AI agents to provide JavaScript-based tools to AI agents. Proposed WebMCP is an attempt to replace DOM Scraping particularly for AI Agents. This basically means that instead of an AI agent parsing web page’s HTML, reading accessibility trees, or taking screenshots to guess what interactable elements such as web buttons or forms do, the website using WebMCP will explicitly declare what actions are available and what inputs they require for AI Agents to interact with.
Benefits of Using WebMCP?
For website owners WebMCP offers new opportunities. When a website is fully optimized with great content, AI Agents such as ChatGPT, Google Gemini and Google AI Mode can surface your website’s content. That’s great news.
What about when users searching within AI chats user-interface (ChatGPT, AI mode or Google Gemini or others), or when they want to extend the search? How about when a user asks the AI Agents to take certain tasks, such as purchase something, or, making a booking for the user, find out more information. This is where website’s using WebMCP will be rewarded because AI agents can interact with your website without even sending the user. For a website that isn’t using WebMCP, this could mean lost traffic.
Why Use WebMCP?
Internet, although meant to represent access to collective human knowledge, and, connect us with each other (global system of interconnected computer networks ) is now mainly used to conduct eCommerce. Furthermore, global competition for AI dominance means that multinational companies want to provide 1-stop solution to their own users (ChatGPT, Google Gemini and its generative AI features). What does this translate to for the business website owner? Just know that when internet giants support something, it will only grow like an oak tree. Basically, either we use WebMCP on an fully optimized website, or, we may not a business website in this AI era.
How NOT to Add WebMCP to WordPress
Since we’re talking about WordPress, you will see many plugins that promise to make your WordPress site WebMCP ready. But, that is not how you meant to use Model Context Protocol (WebMCP). To make a website full search engine optimized that also includes WebMCP, you need to do bit of planning of your full implementation.
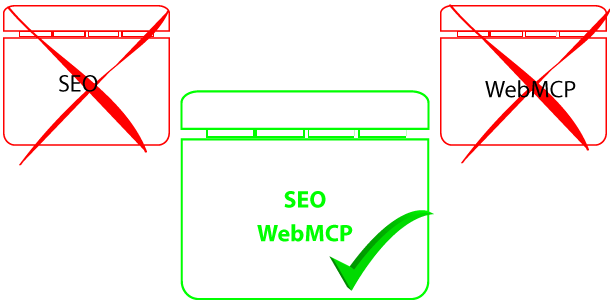
Ask yourself “what exactly does your entire website offer, and, what other Schema Markup data types it uses. Why? Because if the website information including Schema Markup entities are not consistent, or, if the website has inconsistent information throughout different URLs, this will definitely confuse AI Agents as they cross reference your entire website content.
Declarative WebMCP: Annotating WordPress Forms
The simplest way to make an existing WordPress site agent-ready is through declarative WebMCP. Instead of requiring complex JavaScript bridges, declarative WebMCP annotates standard semantic HTML forms with dedicated tool attributes. Browser agents parse these attributes directly to understand what an input field accepts and how to submit data on a user’s behalf.
You can apply WebMCP tool attributes directly to custom search bars, contact forms, or booking submissions. Below is an example of an agent-ready lead inquiry form structured with semantic attributes:
<form action="/wp-json/rankya/v1/inquiry" method="POST"
      toolname="submit_service_inquiry"
      tooldescription="Submits a project inquiry or SEO audit request for analysis.">

    <label for="client_name">Full Name</label>
    <input type="text" id="client_name" name="name"
           tooldescription="The full legal or business name of the user" required />

    <label for="client_email">Email Address</label>
    <input type="email" id="client_email" name="email"
           tooldescription="Direct contact email address for receiving audit reports" required />

    <label for="website_url">Target URL</label>
    <input type="url" id="website_url" name="url"
           tooldescription="The full website address requiring analysis (e.g., https://example.com)" required />

    <button type="submit">Submit Inquiry</button>
</form>
When an AI agent visits this page, it bypasses speculative scraping. It reads the toolname (for the HTML form), field description (tooldescription of the form fields), structures the parameters toolparameters according to the required inputs, and submits clean payload data directly through standard browser events.
WordPress Comment Form example: 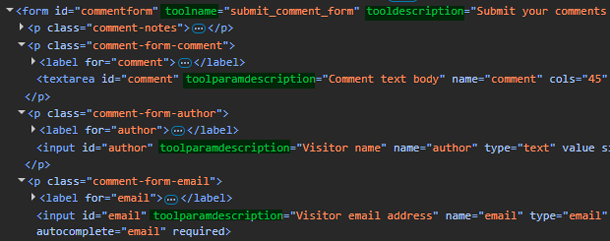
Preparing Your WordPress Environment for WebMCP
Before using Plugins, writing or editing code, verify that your WordPress hosting environment supports modern PHP execution and clean REST API routing. Because WebMCP operations often interact with custom endpoints or JavaScript bridge scripts, your server configuration must handle asynchronous requests efficiently.
- Ensure your active theme supports clean semantic HTML elements such as aside, article, form, and input tags.
- Check that your REST API endpoints return properly structured JSON responses without unnecessary wrapper markup.
- Configure your caching layers to exclude dynamic WebMCP manifest files or real-time action endpoints from aggressive static caching.
Registering a Custom REST Endpoint Correctly
When using register_rest_route, returning a PHP associative array or a WP_REST_Response object ensures WordPress automatically encodes it into a valid JSON string with the correct application/json header.
/**
 * Register a custom REST API endpoint.
 * Namespace: myplugin/v1
 * Route: /custom-data
 */
add_action( 'rest_api_init', function () {
    register_rest_route( 'myplugin/v1', '/custom-data', array(
        'methods'             => 'GET',
        'callback'            => 'myplugin_get_custom_data_callback',
        'permission_callback' => '__return_true', // Adjust based on auth requirements
    ) );
} );
function myplugin_get_custom_data_callback( WP_REST_Request $request ) {
    $data = array(
        'status'  => 'success',
        'message' => 'Data retrieved successfully.',
        'items'   => array(
            array( 'id' => 1, 'title' => 'Sample Item One' ),
            array( 'id' => 2, 'title' => 'Sample Item Two' ),
        ),
    );
    // Returning an array automatically serializes to clean JSON.
    // Alternatively, wrap in WP_REST_Response for explicit status codes and headers:
    return new WP_REST_Response( $data, 200 );
}
Implementing WebMCP Tool Definitions in WordPress
To register custom WebMCP tools on your WordPress site, you can enqueue custom JavaScript files that declare tool interfaces directly within the browser context, or hook into custom REST API routes. Below is an example of structuring a WordPress plugin function to register tool manifests for AI agents.
/**
 * Register a tool manifest endpoint for AI agents.
 * Namespace: rankya/v1
 * Route: /ai-manifest
 */
add_action( 'rest_api_init', function () {
    register_rest_route( 'rankya/v1', '/ai-manifest', array(
        'methods'             => 'GET',
        'callback'            => 'rankya_get_ai_manifest_callback',
        'permission_callback' => '__return_true',
    ) );
} );
function rankya_get_ai_manifest_callback( WP_REST_Request $request ) {
    $manifest = array(
        'schema_version' => '1.0',
        'name'           => 'RankYa Digital Mastery Toolset',
        'description'    => 'Provides structured tools and optimization endpoints for AI agents.',
        'tools'          => array(
            array(
                'name'        => 'audit_seo',
                'description' => 'Performs a technical SEO audit on specified website paths.',
                'endpoint'    => rest_url( 'rankya/v1/audit' ),
            ),
        ),
    );
    return new WP_REST_Response( $manifest, 200 );
}
Registering Client-Side Tools via the Navigator ModelContext API
For dynamic data retrieval that does not rely on static forms, such as real-time pricing lookups, inventory status checks, or live audits, WebMCP relies on the browser’s native navigator.modelContext interface. This approach registers JavaScript functions directly into the browser’s agent execution environment.
To implement this in WordPress, enqueue a client-side JavaScript file that declares your tools and binds them to your custom REST API routes. This is much better implementation compared to hard coding javascript in to theme files.
1. Enqueuing the WebMCP Script in WordPress
Add this snippet to your custom functionality plugin or active theme functions.php file. It uses a named PHP function to safely register and enqueue the script while passing the site’s REST root URL:
/**
 * Enqueue client-side WebMCP agent tool scripts.
 */
add_action( 'wp_enqueue_scripts', 'rankya_enqueue_webmcp_agent_tools' );

function rankya_enqueue_webmcp_agent_tools() {
    // Only load on front-facing pages
    if ( is_admin() ) {
        return;
    }

    wp_register_script(
        'rankya-webmcp-tools',
        get_stylesheet_directory_uri() . '/js/webmcp-tools.js',
        array(),
        '1.0.0',
        true
    );

    // Pass REST API route parameters to the script
    wp_localize_script(
        'rankya-webmcp-tools',
        'rankyaWebMCP',
        array(
            'restUrl' => esc_url_raw( rest_url( 'rankya/v1/' ) ),
            'nonce'   => wp_create_nonce( 'wp_rest' ),
        )
    );

    wp_enqueue_script( 'rankya-webmcp-tools' );
}
2. Defining the Tool in JavaScript (webmcp-tools.js)
Inside your webmcp-tools.js file, feature-detect the WebMCP interface and register your custom tool schema. When an agent invokes the tool, the function queries your WordPress REST endpoint and returns structured data directly to the agent’s context:
/**
 * WebMCP Client-Side Tool Registration for AI Agents
 */
document.addEventListener( 'DOMContentLoaded', function() {
    // Check if the browser supports the WebMCP interface
    if ( typeof navigator.modelContext === 'undefined' || typeof navigator.modelContext.registerTool !== 'function' ) {
        return;
    }

    // Register an imperative tool for AI agents
    navigator.modelContext.registerTool({
        name: 'fetch_site_seo_status',
        description: 'Retrieves core optimization status and public schema definitions for this website.',
        inputSchema: {
            type: 'object',
            properties: {
                section: {
                    type: 'string',
                    description: 'Specific site section or topic to query (e.g., "technical", "schema", "rest").'
                }
            },
            required: ['section']
        },
        execute: async function( params ) {
            try {
                const response = await fetch( rankyaWebMCP.restUrl + 'custom-data?section=' + encodeURIComponent( params.section ), {
                    method: 'GET',
                    headers: {
                        'Content-Type': 'application/json',
                        'X-WP-Nonce': rankyaWebMCP.nonce
                    }
                });

                if ( ! response.ok ) {
                    return { error: 'Failed to retrieve data from WordPress REST API.' };
                }

                const result = await response.json();
                return { data: result };
            } catch ( err ) {
                return { error: 'Execution error: ' + err.message };
            }
        }
    });
});
This dual implementation declarative HTML form tags for simple user actions and navigator.modelContext registrations for complex REST interactions—provides a complete, standards-compliant foundation for any agent-ready WordPress site.
When structuring your functions, use explicit named functions rather than anonymous closures to maintain clean code standards across your theme files or custom plugins. Ensure that your input parameters match exact data types expected by automated consumers.
Testing and Verifying Your Agent-Ready WordPress Site
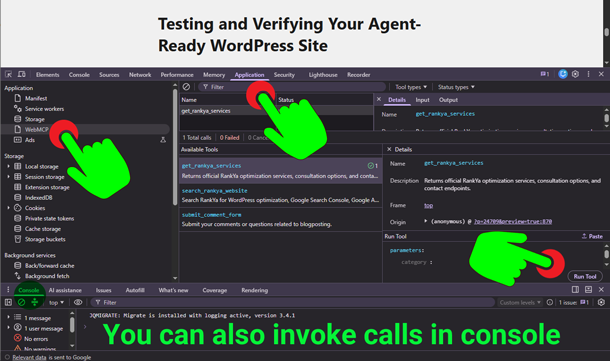
Once your tool definitions and REST endpoints are active, testing how AI agents discover your capabilities is critical. Use browser developer tools and model inspection extensions to verify that tool schemas load correctly on target pages. Monitor your server error logs and REST API request headers to confirm that incoming agent queries process successfully without latency or authentication blocks.
Ready to Optimize Your Website for AI Agents?
Implementing WebMCP tools future-proofs your digital presence for the next era of search and browser automation. Remember, 80% of Agentic Optimization is getting your SEO done right. Start integrating structured tool schemas into your WordPress workflow today to capture high-intent agentic traffic.
Pressed for time, or want a professional to take care of website optimization including WebMCP? Consider
Video Tutorials by RankYa New Services Contact
Frequently Asked Questions
What is the difference between declarative and imperative WebMCP in WordPress?
Declarative WebMCP exposes actions directly through HTML attributes, as in, you declare WebMCP explicitly, on existing semantic elements like web forms and buttons, allowing AI agents to submit data without running custom JavaScript. Imperative WebMCP on the other hand uses the browser’s JavaScript navigator.modelContext API to programmatically register functions, validate schemas, and communicate asynchronously with your WordPress REST API endpoints.
Why does WebMCP require clean JSON without stray HTML markup?
Compared to search engines inspecting the DOM (Document Object Model), AI agents rely on strict JSON parsers to read tool manifests and API payloads. Stray HTML markup, PHP warnings, or unhandled output buffers break the serialization process, resulting in JSON parse failures that prevent AI models from discovering your tools, or executing requested actions on your site.
Do I need heavy third-party plugins to make my WordPress site WebMCP-ready?
No. You can implement WebMCP natively by either hard coding your WordPress Theme, or for more advanced setups, you can register custom REST API routes using register_rest_route, enqueuing lightweight client-side bridge scripts with wp_enqueue_scripts, or annotating standard HTML5 form elements with declarative tool attributes directly in your theme or custom functionality plugin. This will be much better option because performance gains using this approach.